Monday, August 20, 2012

Beige & Red Leopard Gradient

Hi Everybody!

I am very excited to show you guys my latest manicute which I totally love :)

It is made with a simple sponge gradient (or ombre) and some easy animal patterns.


Polishes I used

  • Wild & Mild Nail Art Pen "black"
  • Lumene Gloss & Care "I´ll Wait"
  • Sally Hanson Diamond Strength "3K or more!"

I started with 2 coats of the very nice beige/sand polish. It even has some sparkly microglitter inside!

Then I picked a make up sponge and sponged on some of the raspberry polish and created a fading effect.
After it is good to use a topcoat to make the gradient colours blend nicely into each other.

Then I picked a dotting tool and created a few small random shapes on top of the red gradient with the same beige polish I used before.

Finally I picked my nail art pen and created some black outlines and random marks around the beige dots.
Finnish with a fast drying topcoat and you are done :)


Have a stressfree new week!

Friday, August 17, 2012

Glitter Gal - Turbulence & French Tip

Hello!

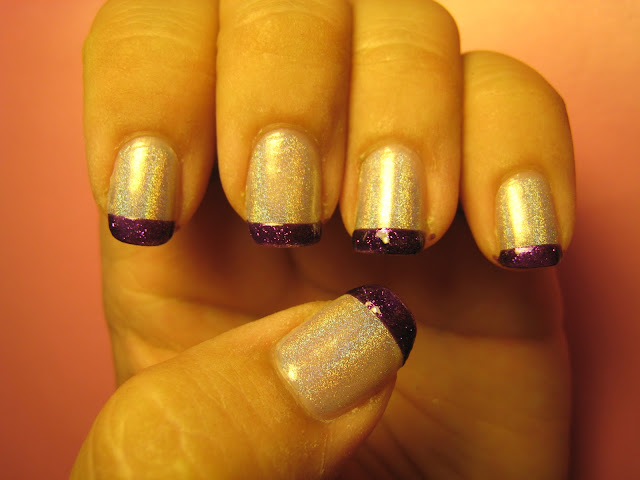
I had no idea what to create. And when I am in such a mood I normally end up using one of my favourite holographic polishes :) In the end I created at least a frech tip in glitter purple and actually I was VERY happy with the result.


I am so sorry that all the pictures are in bad outside light or just artificial light because there was just no sun showing up at all :( It was even raining and grey brrr... So the holo is not easy to see on the pics, but I can just tell - it was awesome :)


Flormar Supershine No. U09                                       Glitter Gal "Turbulence"                 

I used 2 coats of glitter gal - still you can see the white of my nail tips but I anyway covered it with another colour later :)

Then I used my scotch tape to tape off the tips and painted on the purple polish.


I really like how it turned out :) The purple glitter is stunning in the sunlight (which was NOT there when I took the pictures >_<)

I love these Glitter Gal polish. It is just incredible. 


Enjoy your weekend everybody :)

Wednesday, August 15, 2012

Beach-Waves Naildesign

Welcome Back!

While browsing through the internet I found a picture of a beach with beautiful waves and I wanted to try to somehow copy it into an easy simple nail design (I was not in mood for complicated stuff :D )


This picture I got my inspiration from.


I started off with a pearl white polish (just because I could not find my good white ^^) and it worked very well. These colour was just to make the following polishes more visible.


I started to apply randomly some "sand" to my beach. Just with the polishes own brush.
I really like these colour, since there is some very tiny glitter inside it has a truely sandy look.


After I choose a nice vibrant turquoise to create my water next to the beige polish.


Then I picked a piece of a make up sponge and sponged with average white polish and some tweezers some white to the line between turquoise and beige to create the foam on top of the waves.


Finally I added a starfish, a tiny shell and finished with a fast drying topcoat. Thats it :)


I really like how it turned out. I know I could have added some more details or more colours to the water but since I wanted to keep it simple it is ok ^^

See you!!!!

Monday, August 13, 2012

Accessorize Polish - Mink & Essence - Make It Golden

Moi :)

Today I wanted to show you the 2nd polish I bought from Accessorize. Its a very nice taupe colour and I liked it a LOT.

I wore it 2 days just on its own in 2 coats - which is seldom for me to have JUST a normal polish without a design or anything ;)


After 2 days the tips were pretty creepy, so I used one more coat to repair it mostly and added a very nice golden glitter, Essence - Make It Golden.


Friday, August 10, 2012

Green Gradient Design

Hiiiiii!

Today I was absolutely clueless what I could do with my nails, so I asked a friend (lets all wish her a big "get well soon", she just managed to break her leg ... ouch. ). 
"Give me a hint, a design idea or at least some colours I should use!!!" She came up with:
RED & GREEN (and better bright than light) O_o

Oh man... this was hard :D Since I am not a big fan of red I decided to use it just as a highlight and focus on the green - here is what I came up with ^^


O.P.I. " Dont Mess With OPI"
Isadora No. 729 "Marzipan"

I painted all my nails with 2 coats of a pistachio green.

Then I prepared a make up sponge with the same light green which I already used on my nails and painted some of the dark green above. After I pushed it a few times ona  piece of paper to get rid of the polish which was just too much. as well it will create a softer gradient between the colours you used.

Then you just push the make up sponge gently a few times on your nails and it will create a nice gradient design.
And YOU should maybe better use some tape to protect your fingertips, I surely forgot it and had some mess to clean after with cotton sticks and nailpolish remover ;)

Since my friend requested as well to use some red, I decided to pick some fine red glitter from the brand technic. It is super small sparkly glitter in a clear base, perfect for my plan.


Here you can see the ready result in the shadow.

This is what it looked like in the evening sunshine :) I actually really like the contrast between red and green, I would have never used these colours together - thanks for the idea ^^


I wish you all a great weekend :)

Monday, August 6, 2012

Dollish Polish - Putting On The Ritzzz! & Funny stripes

Welcome Back!

Today I used the polish I already swatched sunday, "Zoo" by H&M (check my last post), and created a fun easy nail art out of it :)


H&M "Zoo" as a base

Dollish Polish "Putting on the ritzzz!"
China Glaze "White on White"

Putting on the ritzzz is a supercool transparent indie polish, packed with small and big black & white glitter pieces in hexaonal shapes. I love it so much! And just one coat is so full of glitter that it normally is absolutely enough.

I picked a small paintbrush and started to create thick white lines on my nails.

And then, when the white dried, I just painted one coat of the black & white glitter polish on top :)

Doesnt it just look super cool?

I think I definately should look out for more Dollish Polihs creations <3

Here the last shot in my poor indoor lamp light ;)

You can find Dolish Polish´s treasures on her very own homepage right HERE ^_^

Have you ever tried indie polishes? Which brands are your favourites?

LinkWithin

Related Posts Plugin for WordPress, Blogger...